FAQ
If you could not find an answer to your problem in our FAQ pages, please submit a Tech Support Form
Here are our current trending articles:
Each iRig device is slightly different, some are designed for audio input from sources like guitar, microphones, basses, and others are designed to send MIDI (Musical Instrument Digital Interface) data to the connected device.
To get started with an audio based iRig on iOS or Mac follow these steps. For compatible devices, Windows users can find instructions on getting started here.
- Register your iRig device to unlock any included software. An email will be sent to you showing what you've just unlocked. Click here for a full how-to on unlocking and downloading your iOS, Android, or Mac/PC software.
- Connect your headphones or speakers to your iRig, then connect your iRig to your iOS or Mac system and launch your associated software.
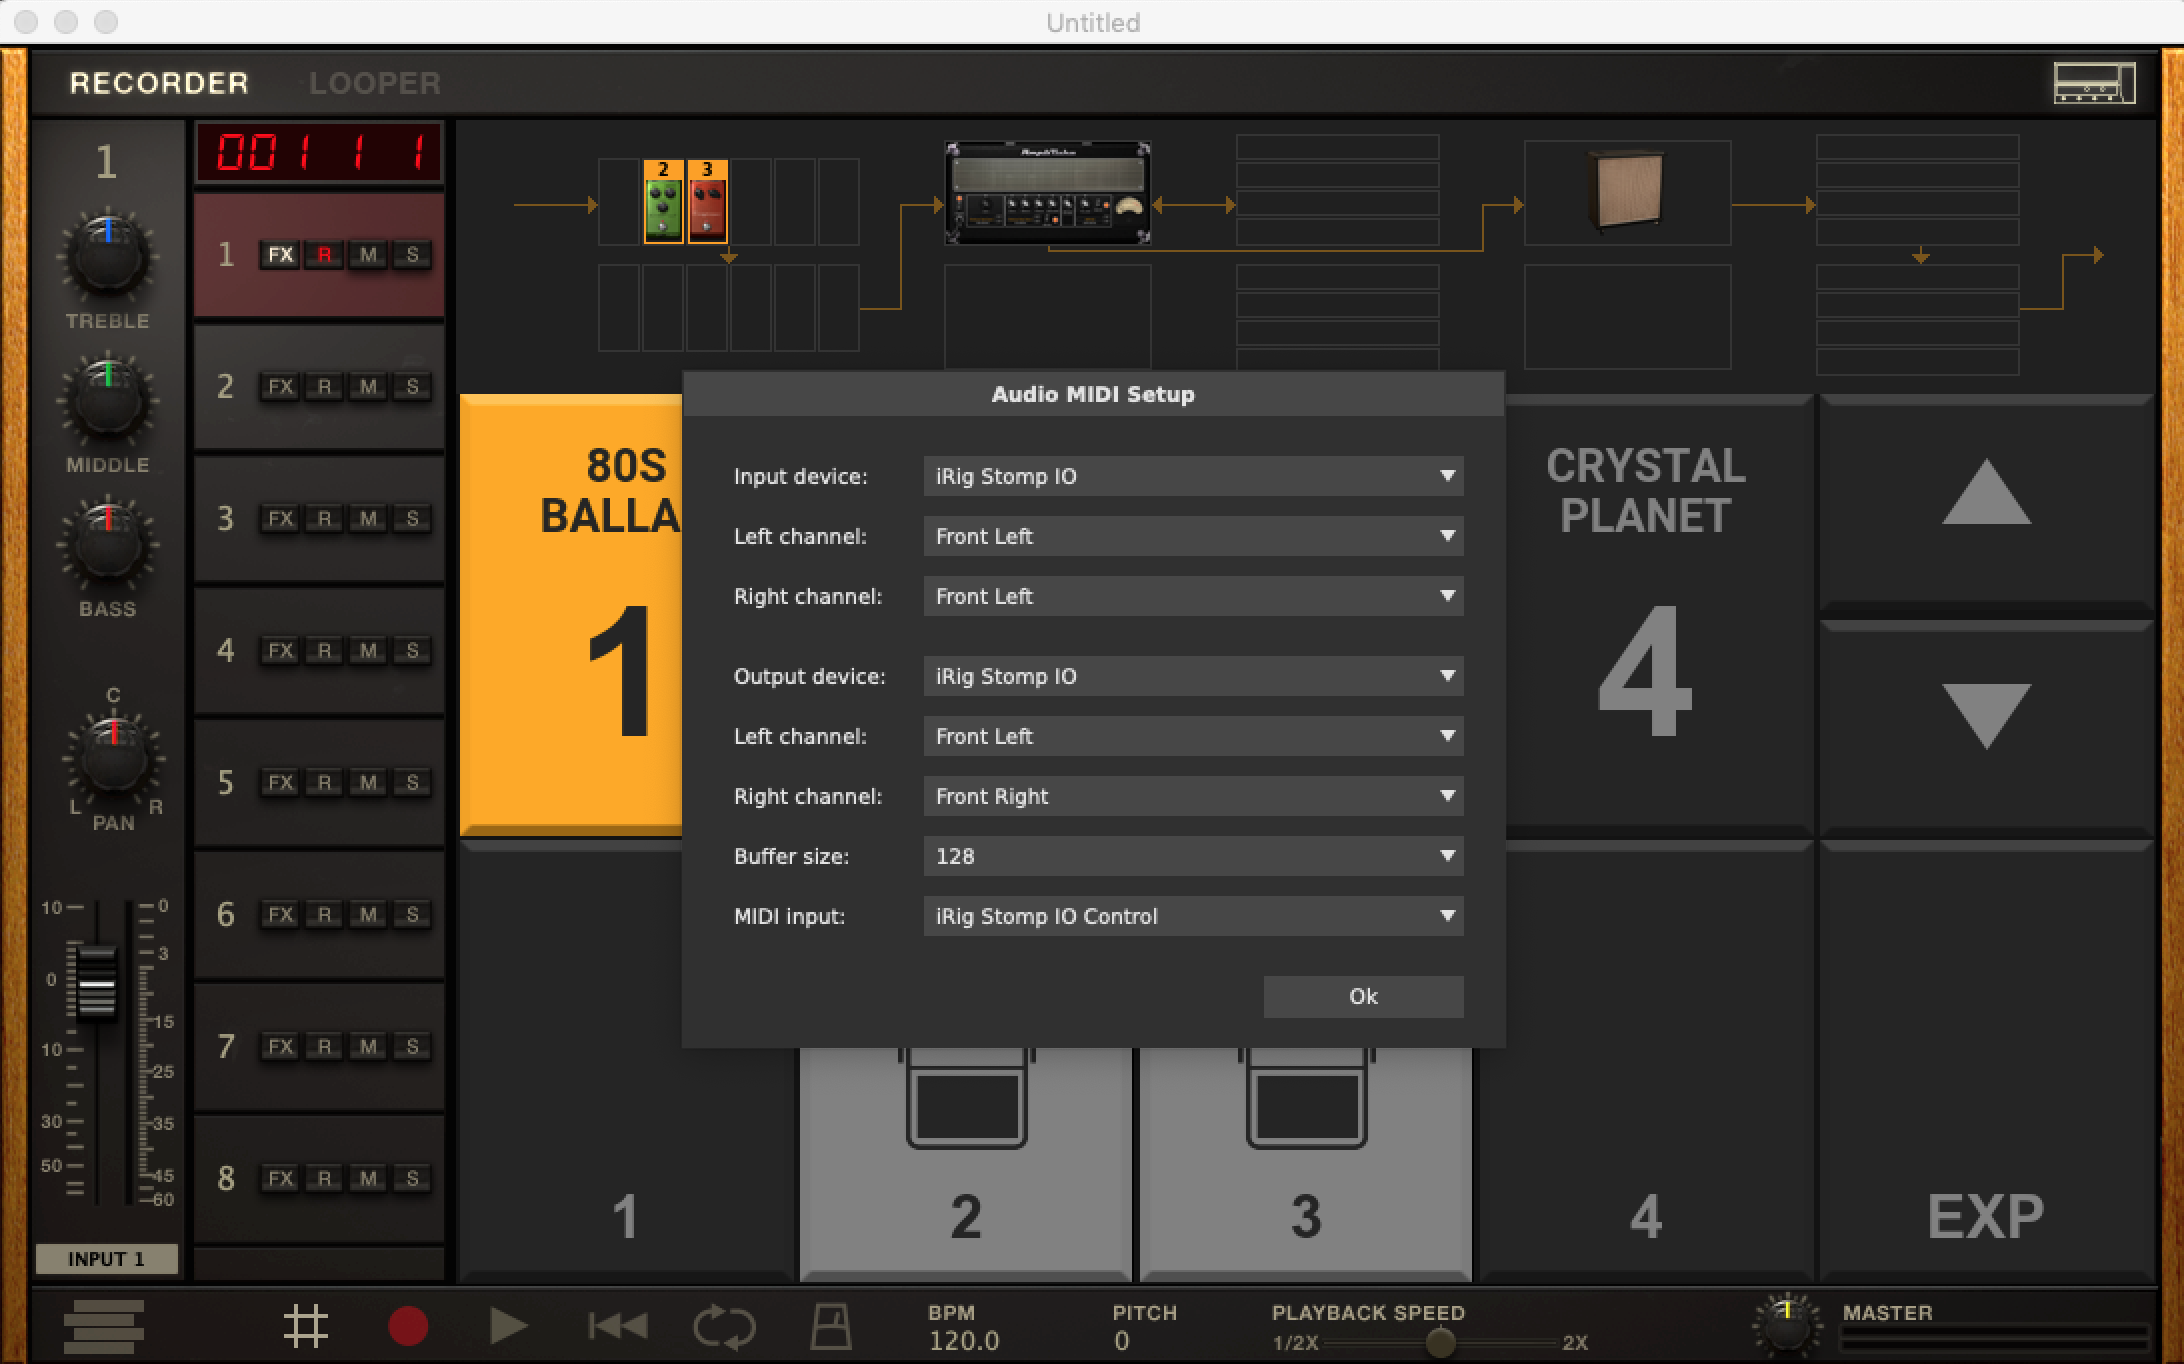
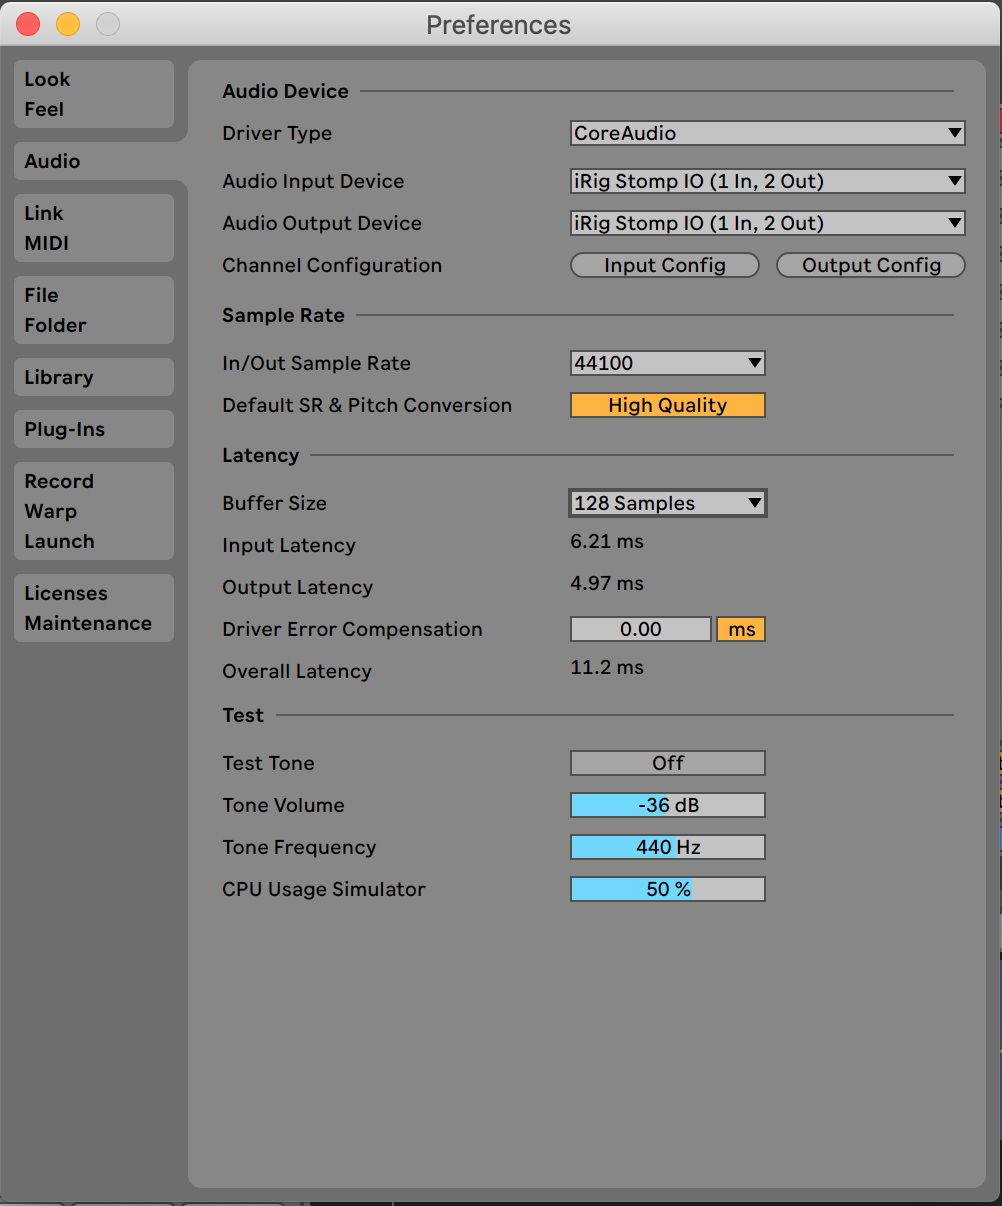
- Mac users will need to select their audio device in the Audio MIDI set up for the software being used.* iOS users can get started right away when using an IK Multimedia app.**
- Get started making music.
**After launching AmpliTube CS, or VocaLive CS, select "Allow" when asked for microphone permissions. If you don't hear input for any reason, check this FAQ for some help.
- Register your iRig device to unlock any included software. An email will be sent to you showing what you've just unlocked. Click here for a full how-to on unlocking and downloading your iOS, Android, or Mac/PC software.
- Connect your headphones or speakers to your iRig, then connect your iRig to your iOS or Mac system and launch your associated software. If your iRig does not offer a headphone port, connect to the iOS headphone port.
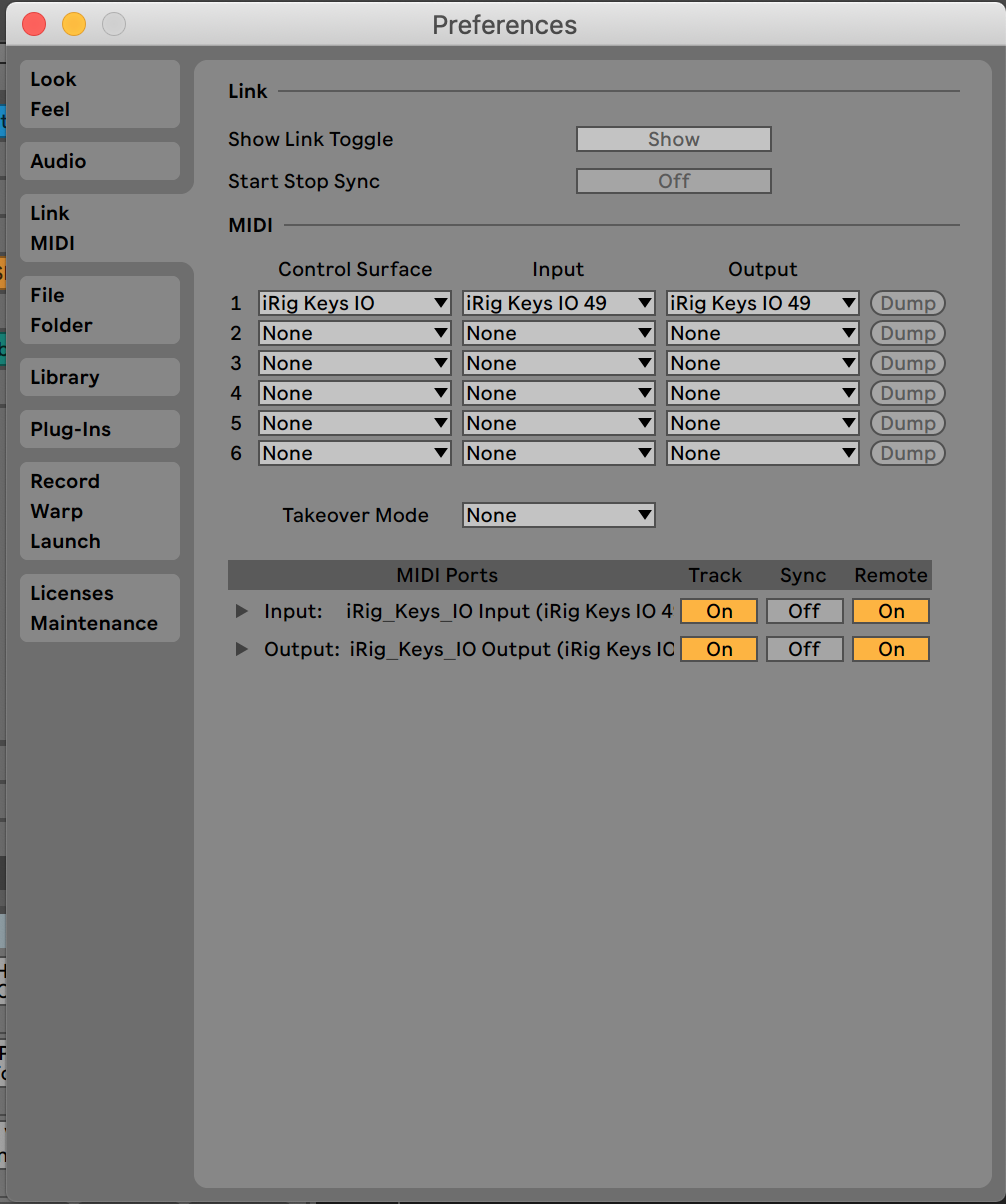
- Mac users will need to select their MIDI device in the Audio MIDI set up for the software being used.* iOS users can get started right away when using an IK Multimedia app.**
- Get started making music.
** If you don't hear audio for any reason, check this FAQ for some help.
FAQ ID: 1298
Apps such as Instagram, YouTube, Snapchat, Zoom Meeting, and Facebook Live allow you to record/stream using both digital and analog iRig devices such as iRig Stream, iRig Pro DUO IO, iRig Pro IO, and more! Want to use your iRig product with House Party? Click Here!
Analog iRig devices use a direct connection to your mobile device's headphone port. This is usually through a 3.5mm TRRS connection. Digital iRig devices use a direct connection to your mobile device's USB-C, Lightning, or Micro-USB port.
Click here to read more about what you need to get started streaming.
Keep in mind, most apps, including Instagram and Facebook Live will not allow the playback of copyrighted content. Playing back copyrighted content can have your Live stream stopped without an error. Some apps will require you to start the video recording to activate your microphone. Not all apps will offer external audio input for every video capture option. In Instagram, the "Story" feature will not allow external devices.
Important: On iOS (iPhone/iPad/iPod), due to the nature of Facebook and Instagram Live and how they capture audio. The below work around can be used with our audio interfaces (such as iRig Stream, iRig Pro DUO I/O, or iRig HD 2) to allow for an uninterrupted audio input source.
Steps:
- Download and launch iRig Recorder 3 LE from the Apple App Store. This is a free app.
- Go to the Menu in the upper right hand corner and then go to Settings. Inside here enable the Background audio option.
- Use the COG WHEEL in the main page to select your input source. Keep in mind this is only an option for multi-input devices, so if you see a greyed out "Mono" option, this is because your device only offers this kind of input signal.
Note: Instagram Live will only allow a mono signal when streaming. Unfortunately, this is not under IK's control. Do note, posting videos will allow stereo signals. - Make sure "Loopback" is not enabled unless intended to be. Read more on Loopback here. Do note, the iRig Stream will allow direct monitoring at all times. In some cases, you might hear a duplicate signal from iRig Recorder 3. In these cases, make sure to mute the headphone level in iRig Recorder 3. To do this, tap the headphone level and then tap the "X" on top of the headphones.
- Launch Facebook or Instagram and go to the Live video function. The audio input will now be routed to these apps.
FAQ ID: 1299
If you've recently purchased your iRig BlueBoard, it is very likely you are already on the latest firmware. To find out how to confirm this, click here
Make sure to try using a different USB port or different USB cable. If this does not help make sure to right click this software and run this as an administrator. Administrative permissions are required to use the iRig BlueBoard firmware updater.
If you still have issues when running this updater as an admin, before moving forward in this FAQ, please check that you are not already updated. When powering on your device, hold the A, B, or C pads. If any of these illuminate on power up, you are already updated and ready to go.
Important: Do not use any USB HUBS or Extension. If using a desktop use a USB port on the back of your system.
If these steps do not help, try the below steps:
- Go into the Windows Task Manager on the Services tab.
- Click on the "Services" or "Open Services" button.
- Right click on the "Windows Search" service and stop it (if it's running).
- Right click on the "Windows Search" service again and click on "Properties".
- As "Startup Type" select "Disabled" (take note of the original setting so you can restore it later). Make sure that the service is now disabled and stopped.
- Right click on the updater executable and run it as administrator.
- Turn on your BlueBoard while holding down the "D" pad and proceed normally with the update. An explorer window might open and close repeatedly when connecting the BlueBoard and during the update, do not click inside it.
- If the update succeeded and the BlueBoard works, go back to Services and restore the original setting for "Startup Type".
FAQ ID: 1300
The iRig 2 will work with compatible Android devices. The iRig 2 requires the CTIA/AHJ wiring standard to operate with an Android device.
At this time there is no dedicated AmpliTube app for the iRig 2 on Android. This device is suggested to use used with apps like EZ Voice, iRig Recorder 3, ToneBridge, Audio Evolution DAW, or n-Track DAW. Any app which allows headset audio input will work with the iRig 2.
To use AmpliTube on the Android platform, we suggest the iRig UA and AmpliTube UA. This iRig device includes it's own DSP chip, which acts as the 'brain' of AmpliTube UA. This allows for a universal experience on the Android platform.
The iRig 2 will work with the AmpliTube for Samsung Professional Audio app on certain Samsung devices (that offer the Samsung Professional Audio) such as the Galaxy Note 3, Note 4, Galaxy Edge, Galaxy S5 and the Galaxy S6. This app is only available on the Samsung Galaxy App Store.
*IMPORTANT* With the release of Android 9.0, Samsung has removed Samsung Professional Audio from their devices and discontinued the service. Android devices running Android 9.0 or later cannot run AmpliTube for Samsung Professional Audio.
FAQ ID: 1301
How do I download the iRig ASIO drivers?
Log in to your IK Account and visit the "Drivers Downloads" section of the User Area. You can visit this page by clicking here
The iRig ASIO drivers will be located in this page.
Why do I need the iRig ASIO drivers?
The iRig ASIO drivers enable professional level audio control over your iRig hardware. With the iRig ASIO drivers, it allows for adjustable buffer sizes and optimal control for ultra low level latency. Overall, performance with ASIO is better and much more stable, resulting in less dropouts and audio processing issues.
Which Windows operating systems work with iRig ASIO?
Windows 7, Windows 8/8.1, and Windows 10 or later.
Do I need the iRig ASIO drivers on macOS?
No. macOS already allows for professional level audio control. That is why it is only offered on Windows.
What if I already installed the iRig Pro DUO ASIO drivers?
We recommend uninstalling the iRig Pro DUO ASIO drivers if you want to use the general iRig ASIO drivers. Both ASIO drivers will work with iRig Pro DUO and iRig Pro DUO I/O; but using the general iRig ASIO will allow it to work with other iRig models.
Which iRig products can be used with the iRig ASIO?
iRig HD 2
iRig Pro I/O
iRig Pro DUO
iRig Pro DUO I/O
iRig Pre HD
iRig Stream
iRig Keys 2 (all)
iRig Stomp I/O
iRig Keys I/O (all)
iRig Mic HD 2
iRig Mic Studio
iRig Mic Cast HD
iRig Mic Video
iRig Micro Amp
FAQ ID: 1302
This can occur when no MIDI Clock data is being sent to the UNO Drum or UNO Synth. Check your SYNC setting to change the MIDI Clock source for the UNO Drum/Synth. This may be set to USB, or EXT without any incoming data. Setting the SYNC to INT or your UNO Drum/Synth unit's internal MIDI Clock will correct this behavior.
Tap the ALT > Sync button to edit the current MIDI Clock source. Use the DATA UP/DOWN buttons to select the different options.
FAQ ID: 1303
Apple recently released the Logic X 10.5 update, which affects usage with Lurssen Mastering Console. This does not affect Logic X 10.4.x and earlier.
Our team is currently investigating some plug-in behavior resulting from this Logic Pro X 10.5 update. Apple has made some changes which can affect all third party plug-ins with this new version.
Fortunately we do have a workaround that will resolve this issue and allow you to continue working with Lurssen Mastering Console:
- Open Logic X 10.5 and insert Lurssen Mastering Console in your session
- On the Lurssen Mastering Console plugin window, navigate to the upper-right corner and click on view.
- On the 'view' dropdown, select controls.
*Since the changes are GUI related, it's best to use the Control page and avoid the GUI until this has been addressed in an update of LMC or Logic Pro X.
Follow this article for all updates regarding Lurssen Mastering Console and Logic X 10.5!
FAQ ID: 1304
This is a guide to help you get SampleTank 4, SampleTank 4 SE, SampleTank 4 MAX, or additional SampleTank 4 expansion libraries installed and loading properly. All of these versions of SampleTank 4 will use the same installation method.
Follow these steps below:
- Find your downloads on the IK web site. These are stored in My Products. To find your version of SampleTank 4 use the Search tool.
- Download your files. Under your product's title find the three different pieces for SampleTank 4 to operate properly.
- SampleTank 4 Software Download - This download can be found to the right of your product title. Select the option for the operating system of your machine.
- SampleTank 4 Instrument Download - This single download can be found under the Sound Download pop up menu.
- SampleTank 4 Samples Downloads - This part of SampleTank 4 is broken up into sections by instrument category. These downloads can be found under the Sound Download pop up menu. Make sure to download all samples sections before getting started. Hold the control (Windows) or command (Mac) key to select multiple downloads. This function is limited to 10 at a time.
- Extract your downloaded files. Use your systems extraction tool to unzip your compressed downloaded files. On Mac double click a file to extract it's contents.
- Install your software and sound content files. Unless you are advanced user, we suggest you use the default locations for your software and sound content. Below are the default locations for both the SampleTank 3 and SampleTank 4 sound content. Even though SampleTank 4 and SampleTank 4 MAX include SampleTank 3 sounds, these libraries are meant to be installed separately to different locations.
Software Installation Example:
Sound Content Installation Example: - Authorize your software. Launch the IK Authorization Manager included with SampleTank 4 and insert your serial number. All product serial numbers are listed in your My Products under Serials & Authorizations.
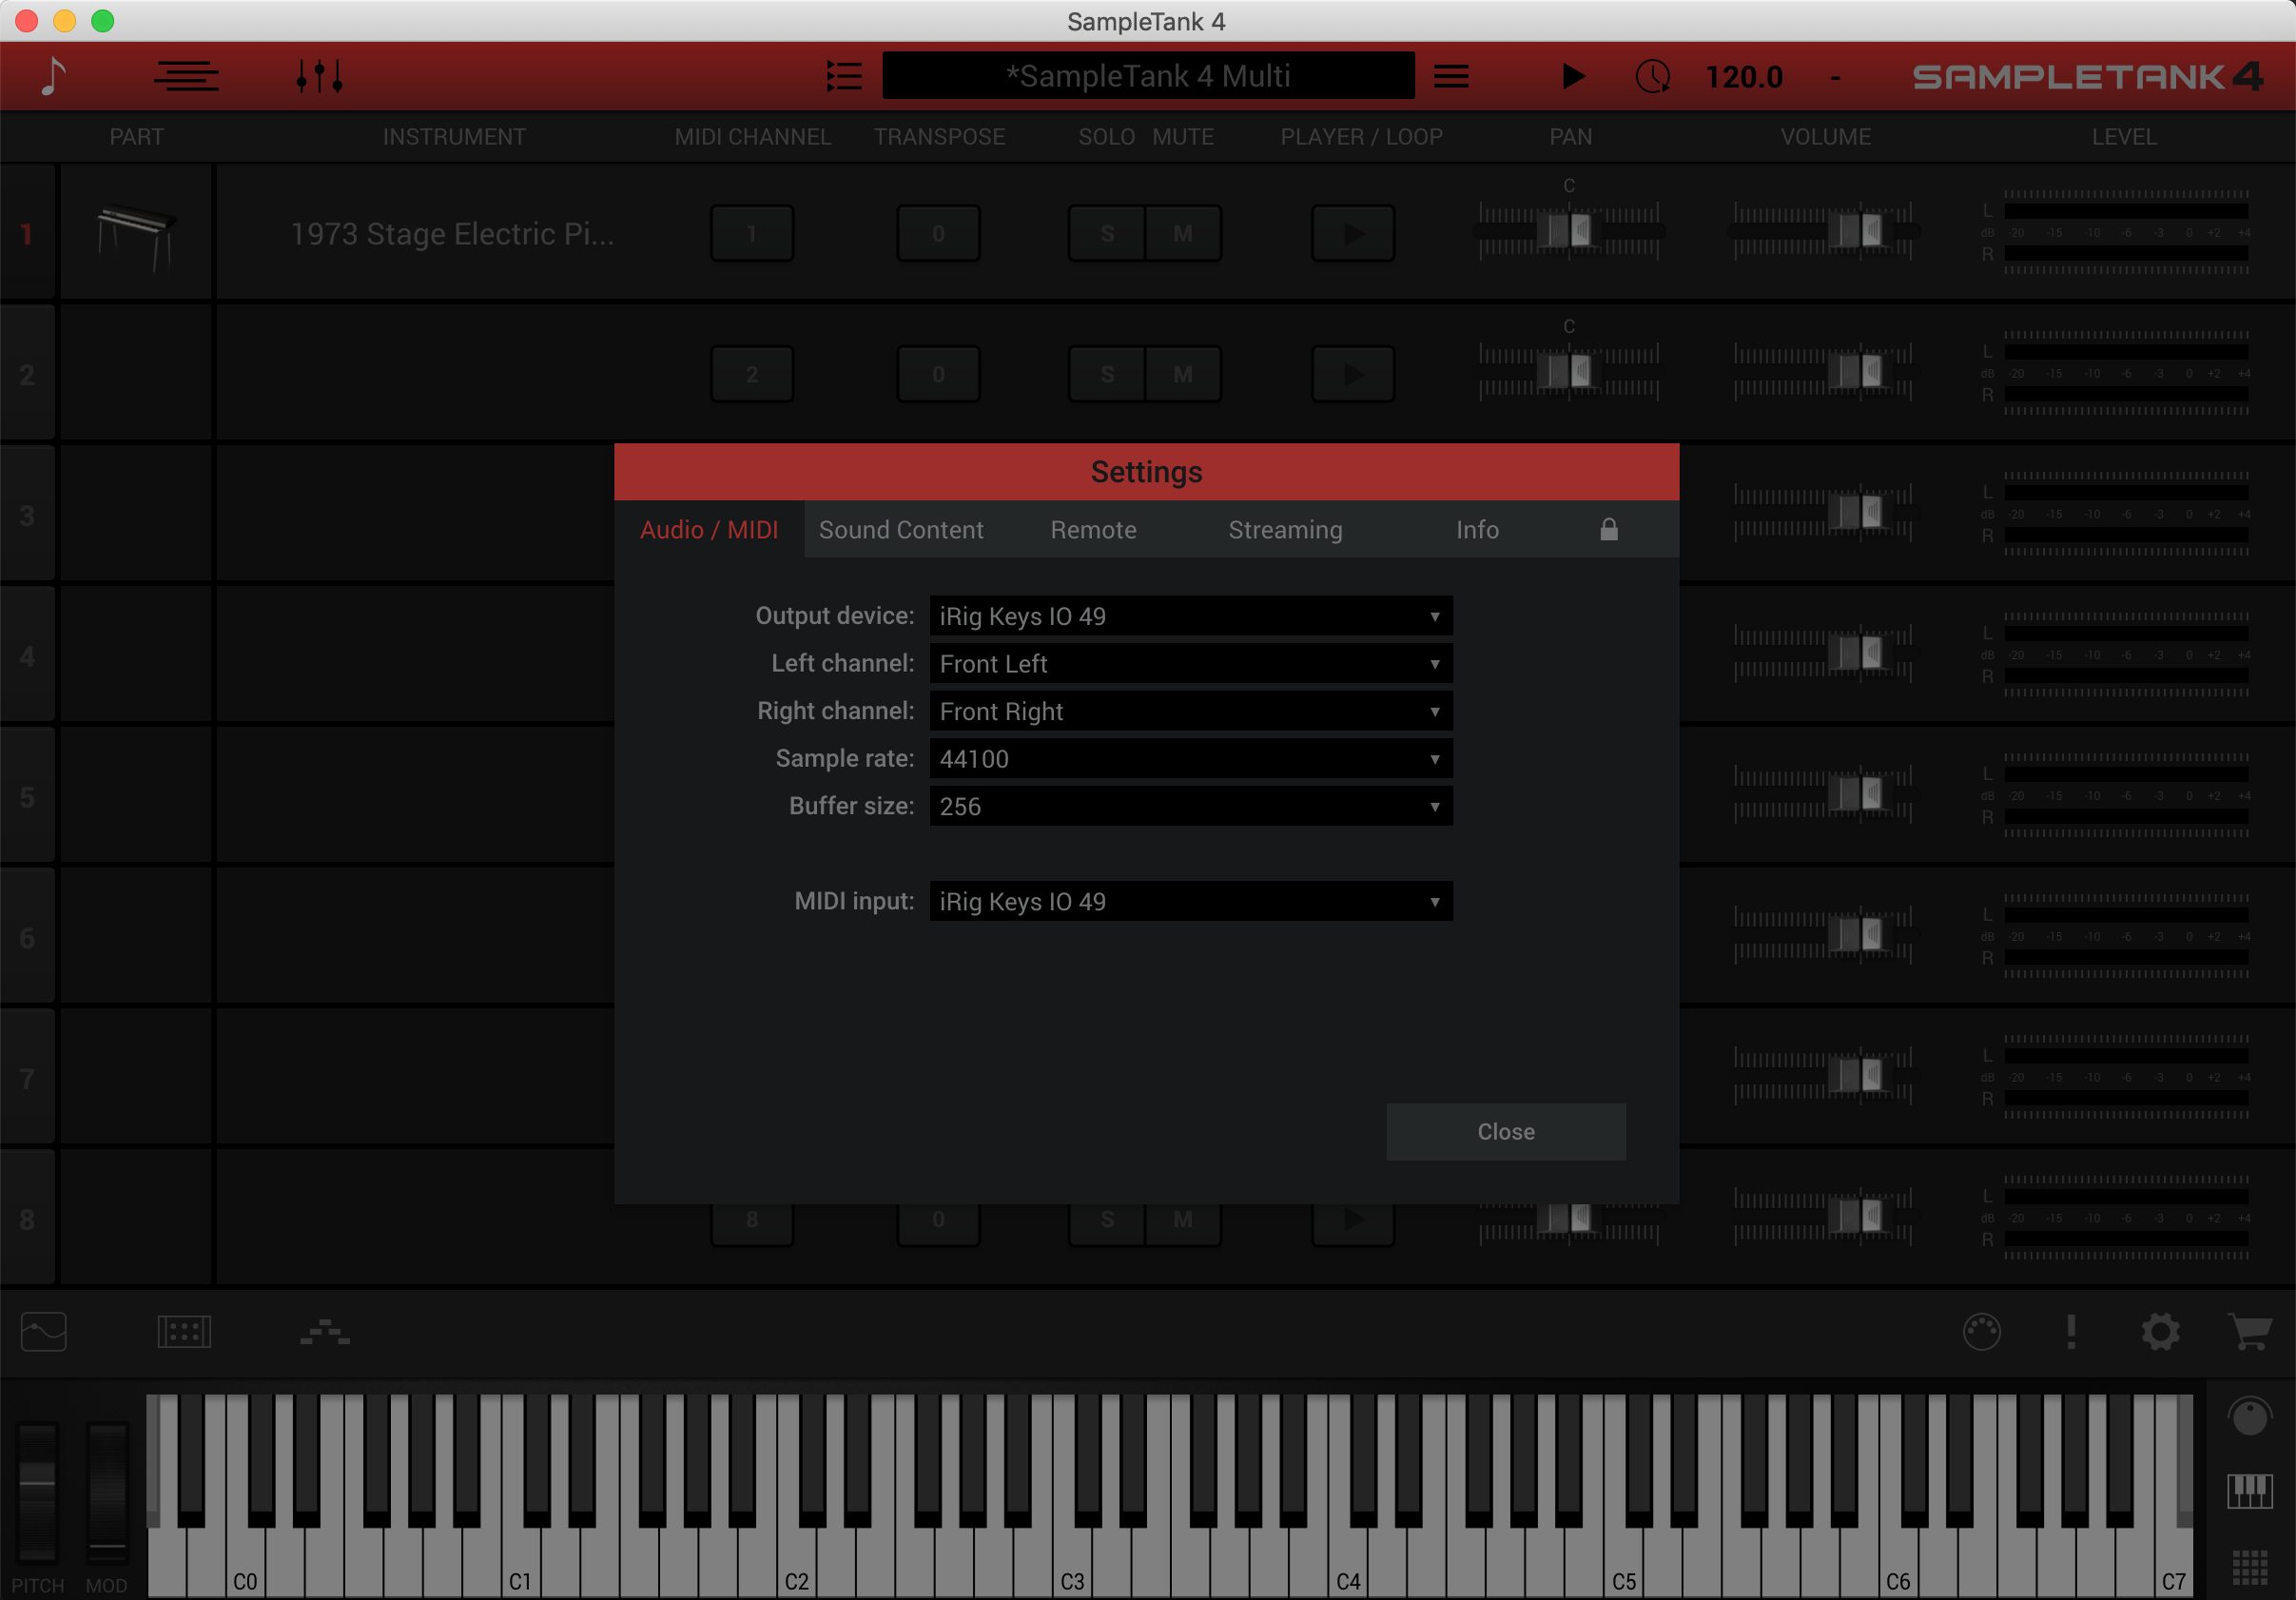
- You're ready to play! Open SampleTank 4 and your newly installed content should be scanned. Once scanned, your instruments will appear ready for use. To change or view where SampleTank 4 is 'looking' for your sounds, go to the Settings > Sound Content page.
Default locations for SampleTank sound content:
Mac:
Mac HD > Users > Shared > IK Multimedia > SampleTank 3
Mac HD > Users > Shared > IK Multimedia > SampleTank 4
PC:
C:\Users\Public\Documents\IK Multimedia\SampleTank 3
C:\Users\Public\Documents\IK Multimedia\SampleTank 4
If you use a custom installation path for your Instruments make sure to install all parts of your sound content to the same location.
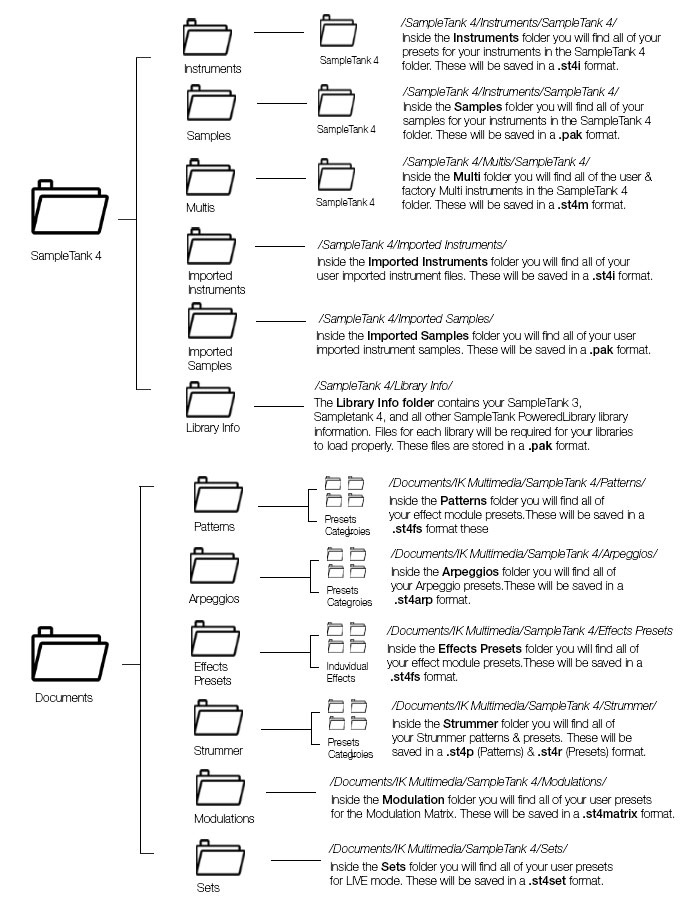
The images above show how your SampleTank 4 sound content folder's top level should look when using a custom install path. Notice there is a certain folder structure here. If this is structure is not seen by SampleTank 4, your sounds may not appear properly.
For extra help, you can find your user manual in My Products as well as the location below after the installation of SampleTank 4.
Mac:
Mac HD > User > Name >Library > Documentation > IK Multimedia > Product Folder
PC:
C:\Program Files\IK Multimedia\SampleTank 4
FAQ ID: 1305
As of macOS 10.14 Mojave and later, there are advanced restrictions on product installers. During installation, you will see a series of various permissions prompted. You must allow all permissions in order for your IK Software to work properly.
Make sure you allow permissions for the following:
Microphone Permissions
Despite it asking for Microphone permissions, the access it allows for is audio input. This is required for apps such as AmpliTube and ARC System. If you aren't getting any audio input, this may be exactly why.
Documents and Desktop Permissions
Affects macOS 10.15 Catalina and later. This permission is required in order for IK software to access presets, instruments, measurements/analysis, and other crucial software files. If you are having issues accessing presets, or if your instruments aren't appearing, this may be why. On ARC 3, this permission is required in order for your measurement analysis to appear in the plugin.
What if I did not allow these permissions?
Fortunately you can manage all of these permissions in the mac System Preferences app.
- Open System Preferences.
- Navigate to Security & Privacy > Privacy (this is a tab in the upper right area).
- On the left pane, select Microphone and make sure the IK app is checked
- Additionally, on the left pane, select Files & Folders and make sure the IK app is checked here as well.
FAQ ID: 1306
How do I get started using the Total Studio 2 Bundle?
All of your software included with this bundle will be available for download in the IK Product Manager. These will also be stored in your "My Products" section of the User Area.
Due to its size, Total Studio 2 is not included as a single download/installer in My Products. The bundled products are all available and listed individually in the IK Product Manager as well as in My Products.
By registering the bundle serial, the individual products will be unlocked and displayed in your account.
Do I need to register my serial number for Total Studio 2 Bundle?
Yes, you must first register your serial number inside of the IK Product Manager. Once registered, the bundle will be unlocked in your IK account. Remember, this bundle serial number unlocks several individual IK product titles (More information below).
What products are unlocked with the Total Studio 2 MAX and Total Studio 2 Deluxe?
Click on the links below for a list of products unlocked in each bundle. Each of these products can be downloaded in the IK Product Manager as mentioned above.
Total Studio 2 MAX
Total Studio 2 Deluxe
Important: While some products like AmpliTube, T-RackS, or MODO BASS include Software only downloads. Any SampleTank 4 related sounds, Miroslav Philharmonik 2, and Syntronik collections will also offer additional downloads under the Sounds category in the IK Product Manager.
FAQ ID: 1307
Can I use my ARC 1 or ARC 2 measurement files?
No. ARC 1 or ARC 2 corrections are not compatible with ARC 3 due to the new algorithm improvements.
Can I use my ARC 1 or ARC 2 microphones?
Yes, ARC 1 and ARC 2 microphones are compatible and fully functional on ARC System 3.
Am I supposed to bounce/export in my DAW with ARC 3 enabled?
No, you must disable the ARC 3 plugin when bouncing/exporting your project in the DAW.
Is ARC 3 Compatible with macOS 10.15 Catalina?
Yes. ARC 3 is compatible with macOS 10.15 Catalina. For more information on compatibility, click here
Why Aren't Any of My ARC 3 Measurements Appearing?
On macOS Catalina, the OS now requires you allow access to the Files & Folders. If none of your measurements are appearing after creating them in the analysis app, you may have inadvertently denied access to the documents.
However, you can enable this at any time. This can be managed in System Preferences > Security & Privacy > Privacy tab.
On the left area of this window, you will see permission categories such as Camera, Microphone, Files & Folders. Select Files & Folders and make sure that ARC 3 is enabled for "Documents" there.
For more ARC 3 FAQ articles and advanced tips, click here
FAQ ID: 1308
Issues with app permissions? Click here.
Currently, these programs are working with macOS Catalina and we have provided compatible updates to the following programs in your IK User Area:
- ARC System 3.0
- Syntronik 1.2.0b
- Miroslav Philharmonik 2.0.6
- T-RackS 5.2.2 and later
- AmpliTube 4.9.0 and later
- MODO BASS 1.5.1b
- MODO DRUM 1.1.0
- Hammond B-3X version 1.1.1 and later
- SampleTank 4 version 4.0.9 and later
- AXE I/O Control Panel 1.1b
- Custom Shop 1.9
- Authorization Manager 1.0.27
- UNO Drum Editor 1.1.0b
- UNO Synth Editor 1.1.0b
- UNO Drum Anthology Libraries (1.0.0)
- UNO Drum Firmware Update (1.0.2)*
- UNO Synth Firmware Update (1.1.4)*
- iRig Firmware Update (1.12.0)*
- iRig Keys I/O Firmware Update (1.2.0)
*Requires forcing installation via right click. Notarization to follow.
Please check this page or your IK product's specifications page for full information on the current officially compatible operating systems.
Legacy/Discontinued products cannot be updated for macOS Catalina.
FAQ ID: 1309


